| Materials/ Visual Shading Language/ Miscellaneous Examples |
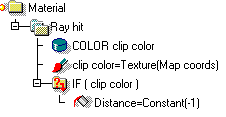
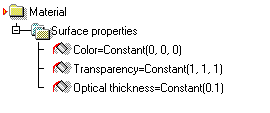
Miscellaneous ExamplesClip mappingClip mapping is the effect where a material removes the underlying surface. The following example demonstrates this: Notes: The 'If' object test can be, for example, a test if the red signal is dark enough: X inside (0, 0.5) Setting the 'Distance' channel to a negative value removes the surface. There is a VSL wizard available for clip mapping, as well as a template in the 'Image Maps' folder. Example file: tutorprojects/material/vsl/clipmap Simple glassThis is the structure of a very simple glass-like material:
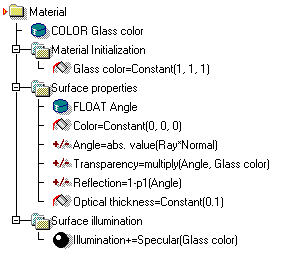
Example file: tutorprojects/material/vsl/simpleglass Realistic glassThe glass material below is created by the Glass VSL wizard. It produces realistic looking glass.
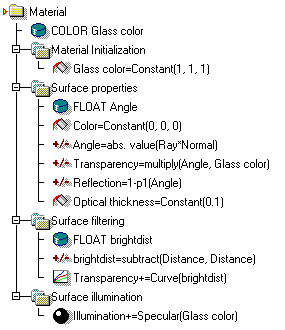
Possible improvements: If accurate reflectivity control is required, a curve object can be added to surface properties: The 'Surface filtering' shader can be used to control the glass shadow creation. For example: Example file: tutorprojects/material/vsl/spectralglass SteelIn this example, the VSL structure of a metal created by the 'steel' wizard is examined; Notes:
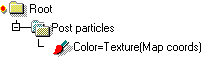
Example file: tutorprojects/material/vsl/steel By replacing the 'Random 'object with a 'Noise' object, the rough appearance of the previous material can be changed to a 'brushed' metal appearance. The brush effect requires that the mapping used defines one dimension that is strongly compressed. The cylinder mapping axis is made very short for this purpose in the example project. Texture mapped post processing particlesThe color of particles can be defined using a VSL material:
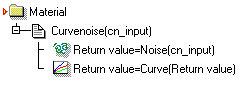
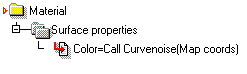
Notes: A 'Post particles' shader defines properties for particles that are rendered using a post effect such as Lens flare or Particle disks. Properties for 'Scan line' type particles are defined using a 'Surface properties' shader. Example file: tutorprojects/material/vsl/texturedparticles User defined VSL proceduresThe program includes tools for creating new user defined VSL objects. Frequently needed algorithms can be collected into a VSL procedure library. The procedures can be called from VSL materials. For example:
Now the procedure is ready. The structure is:
Example file: tutorprojects/material/vsl/vslprocedure
Aluminium with blurred reflectionsCustomized ray tracing effects can be generated using the 'Raytrace' VSL object. The following aluminum like material generates strongly blurred reflections:
Blurring is created by a Raytrace object in a Surface finishing shader. The Raytrace object traces 5 random rays around the reflection direction. Each sample direction is strongly randomized. The rendered image shows how reflections remain recognizeable only at a very close range from the aluminium surface.
The image quality depends heavily on the amount of traced samples. It is easy to adjust the amount of traced rays, but high values should be used with care. If the scene contains aluminium surfaces that reflect each other, computation task (and hence rendering time) increases very rapidly when sampling rate grows. Already at a recursion depth 3 and sampling rate 10 one single aluminium surface evaluation can generate 10*10*10 = 1000 ray trace operations! Both recursion depth and recursion threshold should then be adjusted to keep the rendering time tolerable. The material itself can also define a local recursion limit: the 'Raytracer' object can be placed inside a 'If' level which tests that recursion depth is less than 1.01. It is also possible to define a post processing configuration which filters away the noise of a shading component before adding it to the image. For details, see the example Post Processed Illumination. Example file: tutorprojects/material/vsl/blurredaluminium |


 |
 |